Under-Deck Drainage

Under-Deck Drainage: Doubling Your Outdoor Living Space on an Elevated Deck

Highlights from this Article:

  • An under-deck drainage system collects rainwater as it drains between deck boards and channels it away, keeping the area below the deck completely dry.
  • Ann Arbor Decks installs both Trex RainEscape and TimberTech DrySpace, two systems with meaningfully different installation approaches.
  • Trex RainEscape installs over the joists before decking goes down; it cannot be added to an existing deck without removing the boards. TimberTech DrySpace installs under the joists and can be retrofitted to most existing elevated decks.
  • Both systems protect the framing from moisture, extending the life of the deck’s structural components.
  • Once the drainage system is in place, the space below can be finished with a vinyl beaded ceiling, lighting, ceiling fans, or left open with the drainage system visible.

Skip down to the system comparison table or the FAQs.

Most homeowners don’t think much about what happens under their elevated deck when it rains. Water passes through the gaps between deck boards, drips onto the joists and framing, saturates the space below, and generally makes the area unusable during and after any precipitation. On a second-story deck over a walkout basement, that means a lower patio that’s wet and muddy whenever the weather turns. On a higher first-floor deck, it means a storage or entertaining area that gets rained on just as much as the surface above.

An under-deck drainage system changes that equation completely. Instead of letting water fall through onto everything below, the system catches it at the framing level and channels it away through a network of troughs, panels, and downspouts, leaving the space below clean, dry, and genuinely usable in almost any weather.

Why You’d Want Under-Deck Drainage

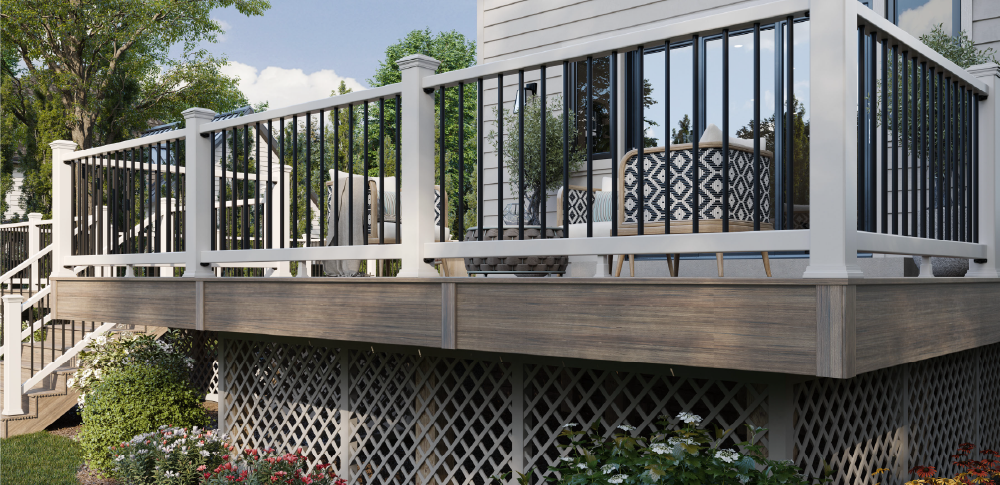
The most obvious reason is usability. A dry under-deck space is a legitimate outdoor room. Depending on the height clearance below your deck, it can accommodate outdoor furniture, a dining or lounge area, a grill station, an outdoor kitchen, a hot tub surround, or simply a protected storage area that stays dry year-round. In Michigan, where spring and fall weather can be unpredictable, having a rain-protected outdoor space extends the season meaningfully.

There’s also a structural benefit that often goes unmentioned. An over-the-joist drainage system (like Trex RainEscape) creates a barrier above the framing that keeps moisture off the joists and beams entirely. Pressure-treated lumber, even quality material, has a finite lifespan when it’s repeatedly wetted and dried over years of Michigan weather. A system that keeps the framing dry from the start can significantly extend the structural life of the deck. For a composite deck surface that carries a 25- to 50-year warranty, protecting the wood substructure that supports it is a worthwhile investment.

The Two Systems We Install

Trex RainEscape

Trex RainEscape is an over-the-joist system. Before the deck boards go down, a network of flexible HDPE troughs is laid across the top of each joist bay (the space between joists), and downspouts are positioned to carry water from the troughs down and away from the structure. Butyl tape seals all seams and surrounds fasteners to prevent any water from reaching the framing below. Once the drainage system is in place and tested, the deck boards are installed on top of it.

Because RainEscape sits above the joists, it creates a true moisture barrier for the entire substructure. The joists and framing never see rain at all. The system is available in brown or black to coordinate with the decking above, and Trex offers plug-and-play LED soffit lights that install directly into the RainEscape ceiling from below, making the lighting integration clean and straightforward.

The significant constraint of RainEscape is that it must be installed during the build, before decking goes down. It cannot be added to an existing deck without removing all of the deck boards first. For new deck construction, it’s an excellent system. For an existing elevated deck, it requires either a full resurfacing project (which gives us access to the joists) or a different approach altogether.

TimberTech DrySpace

TimberTech DrySpace takes the opposite approach. Instead of sitting above the joists, DrySpace installs beneath them, attaching to the underside of the deck framing from below. The system uses interlocking V-shaped vinyl panels that snap into brackets secured to the joists, creating a sloped drainage surface that channels water away from the house. The pitch of the system (1/8 inch per foot) ensures consistent drainage toward the gutter or downspout at the perimeter.

The key advantage of DrySpace is that it can be installed on most existing elevated decks without removing a single deck board. As long as there is access from below (which is nearly always the case on an elevated deck), DrySpace can be retrofitted to the existing framing. This makes it the right choice for homeowners who already have an elevated deck in good structural condition and want to add drainage and a finished ceiling without undertaking a full resurfacing project.

DrySpace is made of solid extruded vinyl, is available in Bone and White, and comes with a 25-year limited warranty. The system works with 12-inch and 16-inch on-center joist spacing. It is designed to work with an external gutter at the perimeter to carry water away from the structure.

Can You Add Drainage to an Existing Deck Without Removing the Boards?

Yes, but only with the right system. This is one of the most common questions we get on this topic, and the answer depends entirely on which system you’re considering.

Trex RainEscape requires access to the tops of the joists, which means the deck boards have to come off. If your existing deck is due for a resurfacing anyway (the boards are worn, the surface is tired, or you’re ready for composite), a resurfacing project combined with RainEscape installation is a natural pairing. We access the joists during the resurfacing, install RainEscape before the new boards go down, and you end up with both a new deck surface and a fully functioning drainage system in one project.

TimberTech DrySpace, by contrast, is specifically designed for both new and existing decks. It installs entirely from below. If your deck structure is sound and you’re happy with the surface, DrySpace can be added without disturbing a single board above. We assess the framing from below, confirm the joist spacing and structural condition, and install the system from the underside. This is the practical path for most existing decks where a full resurfacing isn’t otherwise warranted.

Trex RainEscape vs. TimberTech DrySpace at a Glance

Trex RainEscapeTimberTech DrySpace
Installation positionOver the joists (above framing)Under the joists (below framing)
New deck installationYesYes
Existing deck retrofitOnly if deck boards are removedYes, without removing deck boards
Protects framing from moistureYes (complete barrier above joists)Partial (water still contacts joists before draining)
MaterialHDPE trough and downspout system with butyl tape sealingSolid extruded vinyl V-panels with bracket system
ColorsBrown or BlackBone or White
Integrated lighting optionYes (Trex plug-and-play soffit lights)Via finished ceiling added below
Warranty25 years25 years

Finishing the Space Below

Once the drainage system is in place, you have choices about how to finish the underside of the deck. The right approach depends on how you intend to use the space, how much you want to invest in finishing, and personal preference.

Leave the Drainage System Exposed

Both RainEscape and DrySpace are reasonably clean-looking systems. RainEscape’s brown or black troughs, viewed from below, give the ceiling a structured, industrial-adjacent look that some homeowners find appealing as-is. DrySpace’s white or bone vinyl panels create a clean, light-colored surface that reads almost like a simple ceiling without any additional finishing. For storage areas or utilitarian spaces, leaving the drainage system visible is a perfectly practical choice that keeps costs lower and installation simpler.

Vinyl Beaded Ceiling

For a more finished look (particularly in spaces intended for outdoor dining, lounging, or entertaining), a vinyl beaded ceiling installed below the drainage system is the most popular upgrade. Beaded vinyl ceiling panels give the under-deck space the feel of a covered porch, with a clean, consistent surface that hides the framing and drainage components completely. The combination of a drainage system above and a finished ceiling below creates what is effectively an outdoor room. Vinyl is the right material for this application because it won’t warp, rot, or absorb moisture the way wood would in an outdoor environment.

Lighting

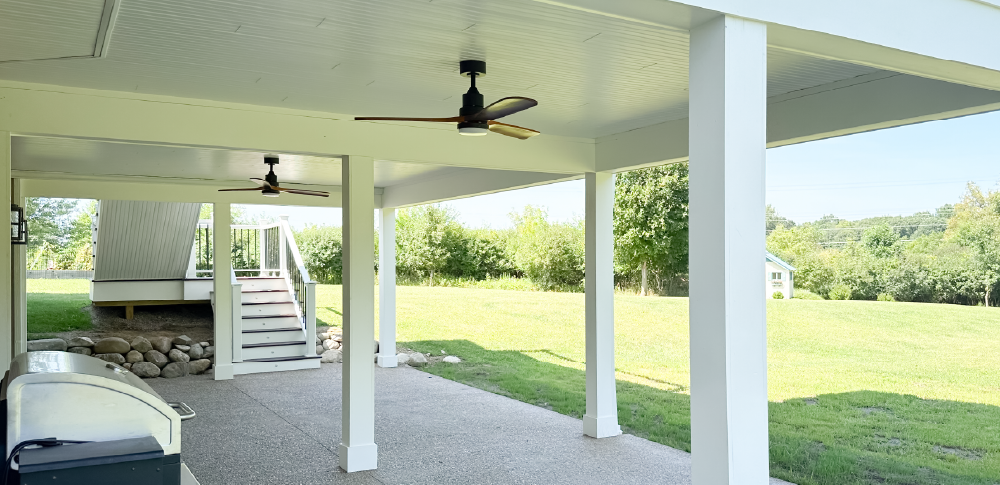
A drainage system creates the infrastructure for safe under-deck lighting, since the ceiling area is dry and protected from above. Trex offers plug-and-play LED soffit lights that integrate directly with the RainEscape system; they install into the trough ceiling from below using spring clips and connect to Trex’s standard low-voltage system. For DrySpace installations, or where a vinyl beaded ceiling is added, recessed or surface-mounted outdoor-rated fixtures can be installed in the finished ceiling. Lighting transforms an under-deck space from a daytime-only storage area into an evening entertaining space and is one of the most impactful upgrades available at a relatively modest cost.

Ceiling Fan

On an elevated deck with reasonable clearance below (typically eight feet or more), a ceiling fan rated for damp or wet outdoor use can be mounted to the deck framing or a finished ceiling below. In Michigan summers, a ceiling fan makes a significant difference in comfort, particularly in humid weather or in south- and west-facing spaces that collect afternoon heat. If a ceiling fan is part of your plan, electrical rough-in needs to be coordinated during the construction phase. This is one of those details that is straightforward to plan for during the build and much more disruptive to add after the fact.

Frequently Asked Questions

Does my deck need to be elevated to use an under-deck drainage system? Yes, in a practical sense. These systems create a dry space below the deck, so there needs to be a meaningful “below” (a patio, walkout basement level, or storage area) that benefits from being kept dry. Ground-level decks don’t have this space and don’t need drainage systems for the same reasons. Elevated decks, second-story decks over walkout basements, and decks with significant clearance below are the right candidates.

How high does my deck need to be for an under-deck system to make sense? There’s no strict minimum, but practically speaking, a deck needs enough clearance for the space below to be useful. Five feet of clearance provides storage utility; seven or more feet opens up genuine living space with room for furniture, a fan, and lighting. We’ll assess the clearance during our consultation and help you determine whether a drainage system makes sense for your specific deck.

Will a drainage system change the look of my deck from above? Not with either system. RainEscape sits between and over the joists, invisible once decking is installed. DrySpace is installed entirely from below and has no effect on the deck surface whatsoever.

How does water exit the system? Both systems direct water to a gutter or downspout at the perimeter of the deck, which carries it away from the structure. RainEscape uses integrated downspouts built into the trough system; DrySpace directs water to a gutter attached at the perimeter. In both cases, the water exits in a controlled location rather than dripping randomly across the area below.

Can I add a ceiling fan to the under-deck space? Yes, provided there’s adequate clearance and electrical access. The fan needs to be rated for outdoor damp or wet locations, and the electrical wiring needs to be properly installed. We coordinate this through our electrician for projects where a fan is part of the plan. If you think you might want a fan at some point, it’s worth discussing during the design phase so wiring can be roughed in ahead of time.

Does under-deck drainage require a permit? Generally not for the drainage system itself, though finishing the space with electrical work (lighting, ceiling fan) does require an electrical permit. We handle permits for all work we perform on your project.

Planning Your Under-Deck Space

Whether you’re building a new elevated deck and want to incorporate drainage from the start, or you have an existing elevated deck and are ready to finally make use of the space below, we’d be glad to walk through the options with you on-site. We’ll look at your clearance, your joist spacing, your existing deck condition, and how you envision using the space, and give you a clear recommendation on which system makes the most sense.

Book your free consultation today. We serve Ann Arbor, Saline, Dexter, Chelsea, Pittsfield Township, Ypsilanti, and the surrounding Washtenaw County area.

Read more

Professional Deck Installation vs. DIY

Professional Deck Installation vs. DIY: A Comparison

Highlights from this Article:

  • DIY deck building is legal and achievable for skilled homeowners, but the full scope of what’s involved is often underestimated at the outset.
  • Permits, drawings, inspections, MISS DIG clearance, and code compliance are required regardless of who builds the deck. None of these go away for a homeowner project.
  • Demolition of an existing deck is a significant project in itself, and one that homeowners frequently underestimate in both labor and disposal cost.
  • Ann Arbor Decks is a TrexPro Platinum certified installer, which provides access to Trex’s extended labor warranty (up to 10 years) and our own 10-year workmanship warranty.
  • The cost savings of DIY are real but smaller than most homeowners expect, because labor is only one component of the total cost.
  • Professional installation carries accountability that a DIY project doesn’t. A contractor’s work is inspected, warranted, and professionally liable in a way that self-built work is not.
  • For complex projects, multi-level decks, elevated decks, or anything involving structural engineering, professional installation is strongly recommended.

Skip down to the DIY vs. professional comparison or the FAQs.

This is a question worth taking seriously rather than dismissing. Homeowners who ask it are usually weighing something real: the cost of professional installation is significant, and for someone with genuine carpentry skills, a well-equipped shop, and the time to commit, building their own deck is a legitimate option. We’re not going to tell you otherwise.

What we will do is give you an honest picture of what’s actually involved: not the version that makes it sound easy, and not the version designed to scare you into hiring someone. After building decks in Washtenaw County since 2006, we have a clear view of where DIY projects go well, where they run into trouble, and what professional installation actually provides beyond showing up with tools.

What DIY Actually Involves

The visible part of building a deck (cutting boards, driving screws, framing) is the part most people picture when they think about doing it themselves. It’s real work, but it’s the part a skilled woodworker or experienced DIYer can handle. What often gets underestimated is everything that surrounds that work.

Permits and drawings. In most Washtenaw County municipalities, a deck permit requires detailed construction drawings showing footing size and depth, framing dimensions and spacing, ledger attachment details, railing specifications, and stair design. These drawings need to be accurate enough to pass plan review. Preparing them takes time and specific knowledge of local code requirements. If the drawings are incomplete or incorrect, the permit application comes back for revision, adding weeks to the project timeline.

MISS DIG clearance. Before any footing excavation can begin, a MISS DIG 811 locate request must be submitted and cleared. This is a legal requirement, not optional. The three-business-day waiting period is built into the schedule regardless of who is doing the work.

Inspections. A permitted deck requires a footing inspection before concrete is poured, potentially a framing inspection before decking goes down, and a final inspection before the deck is occupied. Each of these requires scheduling with the building department, being present or accessible, and passing before work can proceed. If an inspection fails, the work stops until corrections are made and a re-inspection is scheduled.

Material procurement and logistics. Ordering the right quantities of composite decking, hardware, concrete, and framing lumber (and having it delivered in the right sequence) takes planning. Over-ordering wastes money. Under-ordering stalls the project while you wait for additional materials. Specialty items like composite railing components, hidden fastener systems, and post hardware have lead times that need to be accounted for. When delivery errors occur (wrong color, wrong length, missing components), we handle the resolution with the supplier directly as part of the project. A homeowner managing their own materials order is on their own when that happens.

Demolition of an existing deck. If you’re replacing an existing deck, demo is its own project before the real project begins. Homeowners consistently underestimate both the labor and the cost involved. Demolishing even a modest deck means disconnecting it from the ledger, pulling fasteners and hardware, breaking apart composite or wood board by board, cutting up and hauling away framing lumber, disposing of concrete footings if they’re being replaced, and renting a dumpster or making multiple dump runs. On a larger or older deck, demo alone can take a full weekend and generate a surprising disposal bill. We include demolition as part of our project scope when it’s needed, so there’s no hidden second job before the build can start.

Tool requirements. A deck build requires more than a circular saw and a drill. Post hole diggers or a rented auger, concrete mixing equipment, a miter saw for angle cuts, levels, chalk lines, impact drivers, specialized jigs for hidden fasteners, post levels, framing squares, and board-spacing tools are all part of a complete tool kit. We own all of it, including the handy extras that make a job faster and more precise. For a DIYer, renting what you don’t own adds cost, scheduling complexity, and return trips when a rental period runs long.

None of this is impossible for a capable homeowner. It’s just more than most people account for when they start thinking about the project.

Where the Cost Comparison Actually Lands

The assumed logic of DIY is: materials cost X, a contractor charges X plus labor, so by doing it yourself you save the labor. This is roughly true but the savings are often smaller than expected, for a few reasons.

First, professional contractors buy materials at contractor pricing that homeowners typically can’t access. The difference varies by material and supplier, but it’s not unusual for a contractor’s material cost to be noticeably lower than retail pricing on the same products. Some of the labor savings get offset by paying retail for materials.

Second, the permit, drawings, and inspection management that a professional handles have real value and real cost in time. When we prepare drawings, submit permit applications, coordinate with the building department, and manage inspections, those hours are absorbed into the project. A DIY homeowner pays for those same hours with their own time.

Third, mistakes are more expensive when you’re doing it yourself. A professional who frames a ledger incorrectly fixes it as part of the job. A homeowner who frames a ledger incorrectly either catches it at inspection (which means redoing the work) or doesn’t catch it, which means a structural problem that may not surface for years. The cost of errors on a professional project is the contractor’s problem. The cost of errors on a DIY project is entirely yours.

This doesn’t mean DIY is a bad financial choice. For a homeowner who genuinely has the skills, the tools, the time, and the patience for the full process, the savings can be real and meaningful. The key is going in with accurate expectations about what those savings actually are, and what you’re taking on in exchange for them.

What Professional Installation Actually Provides

Beyond the labor itself, a professional deck installation from a licensed contractor comes with several things a DIY project doesn’t.

Speed and efficiency. This is what our crew does every day, across every combination of materials, configurations, and site conditions that Michigan throws at us. That repetition produces a pace that a homeowner working weekends simply can’t match. Our team works through rain, cold, and grey skies: essentially every weather Michigan offers short of a tornado. A DIY project that stretches across weekends and weather delays through an entire spring can turn a project that would take our crew days into one that takes a homeowner months, with the job site sitting open and the deck unusable in the meantime.

TrexPro Platinum certification and extended labor warranties. Ann Arbor Decks is a certified TrexPro Platinum installer, and the highest level of recognition Trex awards to contractors. TrexPro Platinum status requires demonstrated mastery of Trex products and installation techniques, a valid contractor’s license, and appropriate insurance. It’s not a designation that every deck builder holds.

One of the most tangible benefits of that certification is access to Trex’s extended labor warranty, which is only available when a deck is installed by a TrexPro Platinum contractor. If you have either Trex decking or Trex railing installed, the labor warranty runs five years. If you have both installed, that extends to ten years, covering the cost of removal, disposal, and reinstallation if a warranted material defect occurs. A DIY installation or an installation by a non-certified contractor does not qualify for this coverage.

In addition to the Trex labor warranty, Ann Arbor Decks backs every project we build with our own workmanship warranty. That covers the quality of our installation work regardless of the product: Trex, TimberTech, cedar, Ipe, or any other material we install. It applies to every project, full stop. Together, these warranties provide a level of protection that a self-built deck simply can’t replicate.

Accountability. A licensed contractor’s work is tied to their license. If the deck fails inspection, they fix it. If there’s a structural problem that emerges after the build, there’s a party to hold accountable and, in most cases, a warranty to invoke. A homeowner building their own deck is both the contractor and the client; there’s no one else in the chain when something goes wrong.

Code knowledge. Building codes for decks cover dozens of specific requirements: footing depth and sizing, ledger attachment methods and flashing, joist and beam span tables, railing height and baluster spacing, stair geometry, handrail graspability, hardware specifications. A professional who builds decks regularly knows these requirements in detail and applies them without having to look each one up. A first-time DIY builder is learning the code from scratch on a project where getting it wrong has structural and safety consequences.

Warranty. As noted above, composite decking warranties often have installation requirements. The Trex extended labor warranty (up to ten years for decking and railing combined) is only available through TrexPro Platinum installers. This is not a minor distinction: it means a homeowner who installs their own Trex deck is leaving a significant warranty benefit on the table.

Insurance. A licensed, insured contractor carries general liability insurance. If something goes wrong during construction (a footing collapses, equipment causes damage, an injury occurs on the job site), the contractor’s insurance covers it. A homeowner doing their own work has no such coverage for construction-phase incidents, and a homeowner’s insurance policy may not cover self-built work that isn’t permitted and inspected.

Design input. A professional deck builder brings a body of experience with what works and what doesn’t, in layout, material selection, structural detailing, and how decks hold up over time in Michigan’s climate specifically. That’s not something a YouTube tutorial provides.

DIY vs. Professional Installation at a Glance

DIYProfessional
Permit and drawingsHomeowner’s responsibilityContractor handles
MISS DIGHomeowner’s responsibilityContractor handles
InspectionsHomeowner coordinates and must passContractor coordinates and is responsible for passing
Material costRetail pricingContractor pricing (typically lower)
Labor costYour timeIncluded in contract price
Accountability for defectsHomeownerContractor (warranty)
Insurance during buildTypically not coveredContractor’s general liability
Code complianceHomeowner’s responsibility to learn and applyContractor’s expertise and license
Manufacturer warranty eligibilityMay be limitedFull warranty with certified installer

When Professional Installation Is Especially Recommended

For a straightforward ground-level or low deck with simple rectangular framing, a skilled and patient homeowner can produce a good result with proper research and preparation. But there are projects where professional installation is strongly advisable regardless of the homeowner’s skill level:

  • Elevated decks and second-story decks. The structural stakes are higher, the framing is more complex, and the consequences of errors are more serious. A deck that fails structurally at six feet off the ground is a different situation than one at grade.
  • Decks attached to the house (ledger-mounted). Ledger attachment is one of the most code-sensitive and failure-prone details in deck construction. Improper ledger connections are among the leading causes of deck collapses–and water intrusion issues. Getting this right requires understanding both the structural requirements and the waterproofing details that prevent rot at the connection over time.
  • Multi-level or complex-geometry decks. Angles, multiple levels, and irregular shapes multiply the planning and execution complexity significantly.
  • Projects requiring engineering. Some municipalities require engineer-stamped drawings for certain deck configurations. This is outside the scope of a typical DIY project.
  • Projects with integrated features. Outdoor kitchens, built-in lighting, under-deck drainage systems, pergolas, and similar elements each add layers of complexity that benefit from professional coordination.

Frequently Asked Questions

Is it legal to build my own deck in Michigan? Yes. Michigan law allows homeowners to build on their own property, and a homeowner can apply for a permit for work they will perform themselves. The requirements (drawings, inspections, code compliance) are the same as for a contractor. What is not legal in Michigan is using a contractor who then asks you to pull the permit in your name for work they perform. That arrangement protects the contractor at your expense, and is a serious red flag.

Will a DIY deck void my composite decking warranty? It depends on the manufacturer and product line. Some composite warranties are valid for any properly installed deck regardless of who installs it. Others, particularly at the premium tier, require installation by a certified professional for full warranty coverage. We recommend checking the specific warranty terms for any product you’re considering before you decide how to proceed.

What if I want to do some of the work myself and hire out the rest? Ann Arbor Decks does not take on partial projects. We occasionally get requests to install just the footings and ledger, with the homeowner planning to complete the framing and decking themselves. We understand the thinking, but our answer is no, and here’s why. When we pull a building permit, we are pulling it for the entire deck. That makes us legally responsible for the full scope of the project through final inspection. We’re not in a position to stake our license on work we didn’t perform. It’s also worth knowing that in Michigan, a licensed contractor cannot legally work under a homeowner permit, so the arrangement would need to be structured with care regardless. If you’re set on doing some portion of the work yourself, you’d need to find a contractor whose business model supports partial scopes, and you’d need to sort out the permit structure carefully with them.

How do I find a reliable deck contractor in the Ann Arbor area? Look for a contractor who is licensed with the state of Michigan, carries general liability and workers’ compensation insurance, and handles their own permits. Ask for references from recent local projects and check that they have experience with the specific materials and configurations you’re considering. A contractor who hesitates on any of these points deserves scrutiny.

The Bottom Line

DIY deck building is a real option for the right homeowner: someone with carpentry experience, adequate tools, time to manage the full process including permits and inspections, and comfort taking on the accountability for the result. For that person, the savings are genuine.

For most homeowners, the hidden complexity of the permit process, the learning curve on code requirements, the coordination of materials and inspections, and the risk profile of getting structural details wrong make professional installation a better investment than the initial cost difference suggests. A deck that’s permitted, inspected, structurally sound, and covered by a contractor’s warranty is a different asset than one that isn’t, particularly when it comes time to sell the home.

If you’d like an accurate picture of what professional installation would actually cost for your specific project, we’re glad to put one together.

Book your free estimate today. We serve Ann Arbor, Saline, Dexter, Chelsea, Pittsfield Township, Ypsilanti, and the surrounding Washtenaw County area.

Read more